Amazon Sagemaker Autopilot を試す
6/20(土)に開催された、Python機械学習勉強会in新潟 Restart#11 Onlineで、Amazon SageMaker Autopilotについてお話ししました。 発表の中でデモを行っていますが、そのデモの内容をまとめてみました。
勉強会の発表資料は、こちらになります。
Amazon SageMaker Autopilot とは何か
ざっくりいうと、Amazon SageMakerで使える「AutoML」機能です。 学習済モデルを作るためのトレーニング部分について、 アルゴリズムの選択やハイパーパラメータチューニングなどを自動で行ってくれます。
やったこと
Amazon SageMaker Studioで、以下のことを行いました。
- サンプルノートブック実行
- Kaggleのコンペで試す
1. サンプルノートブック実行
AWSが公開している、SageMaker Autopoilotのサンプルノートブックを実行してみました。
この中で、やっていることはこんな感じですね。
- 事前準備
- データのダウンロード
- S3にデータをアップロード
- Autopilotジョブの設定
- Autopilotジョブの起動
- Autopilotジョブの進捗確認の確認
- 結果確認
- データの削除
以下、もう少し詳しくみていきます。 目的変数を指定するだけで、中のデータから「回帰」なのか「二項分類」なのか「多クラス分類」なのかを 自動的に判断した上で、適切なモデルで学習してくれるので便利ですね。
- 事前準備 (“Prerequisites"の部分)
- S3のバケット取得とオブジェクトキーのプレフィクス設定
- IAMロールの取得
import sagemaker import boto3 from sagemaker import get_execution_role region = boto3.Session().region_name session = sagemaker.Session() bucket = session.default_bucket() prefix = 'sagemaker/autopilot-dm' role = get_execution_role() sm = boto3.Session().client(service_name='sagemaker',region_name=region) - データのダウンロード (“Downloading the dataset"の部分)
- インターネットに公開されているデータセットを、SageMakerのノートブックインスタンスにダウンロード
!wget -N https://sagemaker-sample-data-us-west-2.s3-us-west-2.amazonaws.com/autopilot/direct_marketing/bank-additional.zip !unzip -o bank-additional.zip local_data_path = './bank-additional/bank-additional-full.csv' - S3にデータをアップロード (“Upload the dataset to Amazon S3"の部分)
- S3アップロード前にデータ内容を確認し、学習に使うデータ(train_data)と最後に推論して確認するために使うデータ(test_data)に分けてS3にCSVファイルをアップロード
- まずは、データの内容を確認
import pandas as pd data = pd.read_csv(local_data_path) pd.set_option('display.max_columns', 500) # Make sure we can see all of the columns pd.set_option('display.max_rows', 10) # Keep the output on one page data- 次に、データを学習に使うデータ(train_data)と最後に推論して確認するために使うデータ(test_data)に分ける。
train_data = data.sample(frac=0.8,random_state=200) test_data = data.drop(train_data.index)- テストデータでは、目的変数である「
y」の列を削除
test_data_no_target = test_data.drop(columns=['y'])- 各データをCSVファイルに変換してS3にアップロード
- テストデータはCSV変換時にヘッダ行を削除することに注意
train_file = 'train_data.csv'; train_data.to_csv(train_file, index=False, header=True) train_data_s3_path = session.upload_data(path=train_file, key_prefix=prefix + "/train") print('Train data uploaded to: ' + train_data_s3_path) test_file = 'test_data.csv'; test_data_no_target.to_csv(test_file, index=False, header=False) ## test_dataのヘッダ行は不要であることに注意 test_data_s3_path = session.upload_data(path=test_file, key_prefix=prefix + "/test") print('Test data uploaded to: ' + test_data_s3_path) - Autopilotジョブの設定 (“Setting up the SageMaker Autopilot Job"の部分)
- 入力データが保存されているS3のパス (
DataSource)- train_dataを使う
- 予測したい「目的変数」の列名を指定 (
TargetAttributeName)- この場合は「
y」
- この場合は「
input_data_config = [{ 'DataSource': { 'S3DataSource': { 'S3DataType': 'S3Prefix', 'S3Uri': 's3://{}/{}/train'.format(bucket,prefix) } }, 'TargetAttributeName': 'y' } ]- 出力先のS3のパス (
S3OutputPath)
output_data_config = { 'S3OutputPath': 's3://{}/{}/output'.format(bucket,prefix) } - 入力データが保存されているS3のパス (
- Autopilotジョブの起動 (“Launching the SageMaker Autopilot Job"の部分)
sm.create_auto_ml_job()でジョブが起動AutoMLJobName=でジョブ名を指定するが、実は32文字以下にする必要がある
from time import gmtime, strftime, sleep timestamp_suffix = strftime('%d-%H-%M-%S', gmtime()) auto_ml_job_name = 'automl-banking-' + timestamp_suffix print('AutoMLJobName: ' + auto_ml_job_name) sm.create_auto_ml_job(AutoMLJobName=auto_ml_job_name, InputDataConfig=input_data_config, OutputDataConfig=output_data_config, RoleArn=role) - Autopilotジョブの進捗状況の確認 (“Tracking SageMaker Autopilot job progress"の部分)
sm.create_auto_ml_job()は非同期実行なので、進捗状況を30秒毎にprint()で表示
print ('JobStatus - Secondary Status') print('------------------------------') describe_response = sm.describe_auto_ml_job(AutoMLJobName=auto_ml_job_name) print (describe_response['AutoMLJobStatus'] + " - " + describe_response['AutoMLJobSecondaryStatus']) job_run_status = describe_response['AutoMLJobStatus'] while job_run_status not in ('Failed', 'Completed', 'Stopped'): describe_response = sm.describe_auto_ml_job(AutoMLJobName=auto_ml_job_name) job_run_status = describe_response['AutoMLJobStatus'] print (describe_response['AutoMLJobStatus'] + " - " + describe_response['AutoMLJobSecondaryStatus']) sleep(30)- 以下のステータスが表示される
Analyzing Data- 入力データセットを確認して、Autopilotにて試す必要があるMLパイプラインを選択
- 入力データセットをtrainとvalidationに自動的に分割
Feature Engineering- 特徴エンジニアリングを実行し、データから自動的に特徴項目を追加したりする
Model Tuning- ハイパーパラメータチューニングを実行し、最適な結果を生み出すパラメータを選択
- ハイパーパラメータチューニングジョブ回数は、250件実行されました
- モデル候補数が250個作成されたことになります
- 結果確認 (“Results"の部分)
- 最適なモデルを表示
best_candidate = sm.describe_auto_ml_job(AutoMLJobName=auto_ml_job_name)['BestCandidate'] best_candidate_name = best_candidate['CandidateName'] print(best_candidate) print('\n') print("CandidateName: " + best_candidate_name) print("FinalAutoMLJobObjectiveMetricName: " + best_candidate['FinalAutoMLJobObjectiveMetric']['MetricName']) print("FinalAutoMLJobObjectiveMetricValue: " + str(best_candidate['FinalAutoMLJobObjectiveMetric']['Value']))- “Perform batch inference using the best candidate"では、最適なモデルを使ってバッチ推論をしている
- 推論する際のデータはtest_dataを使う
sm.create_transform_job()でバッチ推論を実行- これも非同期実行なので、進捗状況を30秒毎に
print()で表示
- これも非同期実行なので、進捗状況を30秒毎に
- バッチ推論の結果はS3に保存される
- ファイル名は
inference_results.csv
- ファイル名は
model_name = 'automl-banking-model-' + timestamp_suffix
## 最適なモデルを元に推論パイプラインを使用して、SageMaker用のモデルを作成
model = sm.create_model(Containers=best_candidate['InferenceContainers'],
                            ModelName=model_name,
                            ExecutionRoleArn=role)

print('Model ARN corresponding to the best candidate is : {}'.format(model['ModelArn']))
## バッチ推論するために、バッチ変換設定する transform_job_name = 'automl-banking-transform-' + timestamp_suffix transform_input = { 'DataSource': { 'S3DataSource': { 'S3DataType': 'S3Prefix', 'S3Uri': test_data_s3_path } }, 'ContentType': 'text/csv', 'CompressionType': 'None', 'SplitType': 'Line' } transform_output = { 'S3OutputPath': 's3://{}/{}/inference-results'.format(bucket,prefix), } transform_resources = { 'InstanceType': 'ml.m5.4xlarge', 'InstanceCount': 1 } ## バッチ変換ジョブを実行することで、バッチ推論を実施 sm.create_transform_job(TransformJobName = transform_job_name, ModelName = model_name, TransformInput = transform_input, TransformOutput = transform_output, TransformResources = transform_resources )## バッチ変換ジョブの進捗状況を表示 print ('JobStatus') print('----------') describe_response = sm.describe_transform_job(TransformJobName = transform_job_name) job_run_status = describe_response['TransformJobStatus'] print (job_run_status) while job_run_status not in ('Failed', 'Completed', 'Stopped'): describe_response = sm.describe_transform_job(TransformJobName = transform_job_name) job_run_status = describe_response['TransformJobStatus'] print (job_run_status) sleep(30)## 推論結果を表示 s3_output_key = '{}/inference-results/test_data.csv.out'.format(prefix); local_inference_results_path = 'inference_results.csv' s3 = boto3.resource('s3') inference_results_bucket = s3.Bucket(session.default_bucket()) inference_results_bucket.download_file(s3_output_key, local_inference_results_path); data = pd.read_csv(local_inference_results_path, sep=';') pd.set_option('display.max_rows', 10) # Keep the output on one page data- “View other candidates explored by SageMaker Autopilot"では、候補一覧を表示している
candidates = sm.list_candidates_for_auto_ml_job(AutoMLJobName=auto_ml_job_name, SortBy='FinalObjectiveMetricValue')['Candidates'] index = 1 for candidate in candidates: print (str(index) + " " + candidate['CandidateName'] + " " + str(candidate['FinalAutoMLJobObjectiveMetric']['Value'])) index += 1- “Candidate Generation Notebook"では、モデル候補についての詳細を示したノートブックのS3パスを表示
sm.describe_auto_ml_job(AutoMLJobName=auto_ml_job_name)['AutoMLJobArtifacts']['CandidateDefinitionNotebookLocation']- “Data Exploration Notebook"では、データ探索についての詳細を示したノートブックのS3パスを表示
sm.describe_auto_ml_job(AutoMLJobName=auto_ml_job_name)['AutoMLJobArtifacts']['DataExplorationNotebookLocation'] - データの削除 (“Cleanup"の部分)
- S3にあるデータの削除
- サンプルコードでは全てコメントアウトされていました。
#s3 = boto3.resource('s3') #bucket = s3.Bucket(bucket) #job_outputs_prefix = '{}/output/{}'.format(prefix,auto_ml_job_name) #bucket.objects.filter(Prefix=job_outputs_prefix).delete() - S3にあるデータの削除
今回実行した結果はXGBoostのモデルでした。
S3に保存されているモデルファイル(model.tar.gz)をダウンロードして展開すると、
xgboost-modelというファイルが1つあります。
これはXGBoostのモデルオブジェクトがpickle化されたものなので、
pickle.load()で読み込むと、XBGoostのモデルとして使えるはずです。
ただ、autopilotで自動的に行っているデータの変換を、 ローカル実行時でも行う必要があるので、その部分は私の方で現在検証中です。 うまくローカル実行できそうなら、別途記事書きます。
2. Kaggleのコンペで試す
サンプルだけやっても面白くないので、 すでに公開されている別のデータでもAutopilotを試しました。
データはKaggleのGetting Startedのコンペである、 「House Prices: Advanced Regression Techniques」 のデータを使用しました。
せっかくなので、Autopilotで予測した値でKaggleにsubmitしてみました。
実際に動かしたノートブックは、GitHubに公開しています。
ちなみに、最初はKaggleの定番である、タイタニックのコンペのデータを使っていましたが、途中でエラーになったため、この住宅価格コンペのデータに変えました。
これは、タイタニックコンペのtrainデータ件数は891件に対して、 SageMaker Autopilotは1,000件以上のデータが必要であったため、 データ件数不足でAutopilotジョブ実行時にエラーになってしまいました。
やっている内容は、サンプルノートブックとほとんど変わりません。 サンプルノートブックは二項分類ですが、今回のコンペデータは回帰になります。 Autopilotが、目的変数に応じて自動的にモデルを選んでくれるので、 回帰だからといって特に設定することはありません。
データの取得
Kaggle APIを使用して、データを取得しています。
事前に「kaggle.json」を取得し、SageMaker Studioのインスタンスにアップロードして、所定の位置 (~/.kaggle/kaggle.json)に設置しておきます。
# kaggle API install
!pip install kaggle
# kaggle.json を ~/.kaggle/kaggle.json に格納
!mkdir ~/.kaggle
!mv kaggle.json ~/.kaggle/.
!chmod 600 ~/.kaggle/kaggle.json
Kaggleのコンペ一覧を確認して、所定のコンペのデータセットをダウンロードします。
# kaggle コマンドでコンペティション一覧表示
!kaggle competitions list
# house prices のデータセットを確認
!kaggle competitions files -c "house-prices-advanced-regression-techniques"
# house prices のデータセットをダウンロード
!kaggle competitions download -c "house-prices-advanced-regression-techniques"
SageMaker Studioのインスタンスにunzipコマンドがなかったので、
unzipをインストールして、データセットファイルを展開します。
# 展開
!apt-get install unzip
!unzip house-prices-advanced-regression-techniques.zip
SageMakerの事前準備
サンプルノートブックとの違いは、S3のオブジェクトキープレフィクスだけです。
# Setup SageMaker
import sagemaker
import boto3
from sagemaker import get_execution_role

region = boto3.Session().region_name

session = sagemaker.Session()
bucket = session.default_bucket()
prefix = 'sagemaker/autopilot-house-prices'

role = get_execution_role()

sm = boto3.Session().client(service_name='sagemaker',region_name=region)
S3にデータをアップロード
今回は、列「Id」は事前に削除してから、S3にアップロードしました。
# ID列は削除する
train_data_noindex = train_data.drop(columns=['Id'])
test_data_noindex = test_data.drop(columns=['Id'])
テストデータは、ヘッダ行を除外してアップロードします。
# Upload the dataset to S3
train_file = 'train_data.csv';
train_data_noindex.to_csv(train_file, index=False, header=True)
train_data_s3_path = session.upload_data(path=train_file, key_prefix=prefix + "/train")
print('Train data uploaded to: ' + train_data_s3_path)

test_file = 'test_data.csv';
test_data_noindex.to_csv(test_file, index=False, header=False)  # バッチ推論時に使う際は、ヘッダ無しにすること
test_data_s3_path = session.upload_data(path=test_file, key_prefix=prefix + "/test")
print('Test data uploaded to: ' + test_data_s3_path)
Autopilotジョブの設定
予測したい項目名は、今回は「SalePrice」になるので、TargetAttributeNameに項目名を指定します。
それ以外は、サンプルノートブックと同じです。
# SageMaker Autopilot ジョブの設定
input_data_config = [{
    'DataSource': {
        'S3DataSource': {
            'S3DataType': 'S3Prefix',
            'S3Uri': 's3://{}/{}/train'.format(bucket,prefix)
        }
    },
    'TargetAttributeName': 'SalePrice'   # 予測したい項目名: 今回は'SalePrice'
}]

output_data_config = {
    'S3OutputPath': 's3://{}/{}/output'.format(bucket,prefix)
}
Autopilotジョブの起動
こちらも、サンプルノートブックとほとんど変わりません。
ジョブ名を変えていますが、32文字以内にする必要があります。 (ジョブ名長すぎてエラーになった)
また今回は、時間とお金の節約のためにAutoMLJobConfig={'CompletionCriteria': {'MaxCandidates': 100}},のオプションで、ハイパーパラメータのチューニングジョブを100件まで動かす設定を行っています。
(つまりモデルの候補数を最大100個までとしている)
# SageMaker Autopilot ジョブ起動
from time import gmtime, strftime, sleep
timestamp_suffix = strftime('%Y%m%d%H%M%S', gmtime())

auto_ml_job_name = 'automl-houseprice-' + timestamp_suffix    # AutoMLJobNameは32文字以内にすること
print('AutoMLJobName: ' + auto_ml_job_name)

sm.create_auto_ml_job(AutoMLJobName=auto_ml_job_name,
                      InputDataConfig=input_data_config,
                      OutputDataConfig=output_data_config,
                      AutoMLJobConfig={'CompletionCriteria': {'MaxCandidates': 100}},   # 候補の数を100までで完了する
                      RoleArn=role)
Autopilotジョブの進捗状況の確認
サンプルノートブックと同じです。 ジョブ実行が終わるまで、気長に待ちましょう。
# ジョブのステータスを確認
print ('JobStatus - Secondary Status')
print('------------------------------')

describe_response = sm.describe_auto_ml_job(AutoMLJobName=auto_ml_job_name)
print (describe_response['AutoMLJobStatus'] + " - " + describe_response['AutoMLJobSecondaryStatus'])
job_run_status = describe_response['AutoMLJobStatus']

while job_run_status not in ('Failed', 'Completed', 'Stopped'):
    describe_response = sm.describe_auto_ml_job(AutoMLJobName=auto_ml_job_name)
    job_run_status = describe_response['AutoMLJobStatus']

    print (describe_response['AutoMLJobStatus'] + " - " + describe_response['AutoMLJobSecondaryStatus'])
    sleep(30)
結果の確認
ジョブ実行が完了したら、最良のモデルを確認しましょう。 サンプルノートブックと同じです。
# Result
best_candidate = sm.describe_auto_ml_job(AutoMLJobName=auto_ml_job_name)['BestCandidate']
best_candidate_name = best_candidate['CandidateName']
print(best_candidate)
print('\n')
print("CandidateName: " + best_candidate_name)
print("FinalAutoMLJobObjectiveMetricName: " + best_candidate['FinalAutoMLJobObjectiveMetric']['MetricName'])
print("FinalAutoMLJobObjectiveMetricValue: " + str(best_candidate['FinalAutoMLJobObjectiveMetric']['Value']))
最良のモデルを使用して、Kaggleのテストデータでバッチ推論
最良のモデルができたので、Kaggleのテストデータを使ってバッチ推論します。 サンプルノートブックと、やり方は変わりません。
# 最良のモデル候補で、バッチ推論をやってみる
model_name = 'automl-houseprice-model-' + timestamp_suffix

model = sm.create_model(Containers=best_candidate['InferenceContainers'],
                        ModelName=model_name,
                        ExecutionRoleArn=role)

print('Model ARN corresponding to the best candidate is : {}'.format(model['ModelArn']))
transform_job_name = 'automl-houseprice-transform-' + timestamp_suffix

transform_input = {
    'DataSource': {
        'S3DataSource': {
            'S3DataType': 'S3Prefix',
            'S3Uri': test_data_s3_path
        }
    },
    'ContentType': 'text/csv',
    'CompressionType': 'None',
    'SplitType': 'Line'
}

transform_output = {
    'S3OutputPath': 's3://{}/{}/inference-results'.format(bucket,prefix),
}

transform_resources = {
    'InstanceType': 'ml.m5.4xlarge',
    'InstanceCount': 1
}

sm.create_transform_job(TransformJobName = transform_job_name,
                        ModelName = model_name,
                        TransformInput = transform_input,
                        TransformOutput = transform_output,
                        TransformResources = transform_resources
)
# 完了するまで待つ
print ('JobStatus')
print('----------')


describe_response = sm.describe_transform_job(TransformJobName = transform_job_name)
job_run_status = describe_response['TransformJobStatus']
print (job_run_status)

while job_run_status not in ('Failed', 'Completed', 'Stopped'):
    describe_response = sm.describe_transform_job(TransformJobName = transform_job_name)
    job_run_status = describe_response['TransformJobStatus']
    print (job_run_status)
    sleep(30)
# 推論結果を表示
s3_output_key = '{}/inference-results/test_data.csv.out'.format(prefix);
local_inference_results_path = 'inference_results.csv'

s3 = boto3.resource('s3')
inference_results_bucket = s3.Bucket(session.default_bucket())

inference_results_bucket.download_file(s3_output_key, local_inference_results_path);

data = pd.read_csv(local_inference_results_path, sep=',', names=['SalePrice'])
pd.set_option('display.max_rows', 10)         # Keep the output on one page
data
Kaggleに投稿
最後に、推論結果をKaggleに投稿してみました。 推論結果データに、test_dataのId列を連結し、ヘッダ行も追加した状態の CSVファイルを作成して、Kaggleにsubmitします。
# submit用データ作成
submit_data = pd.merge(test_data[['Id']], data, left_index=True, right_index=True)  # Id列を連結
submit_data.to_csv('submit.csv', index=False, header=True)
submit_data
# Kaggleにsubmit
!kaggle competitions submit -f submit.csv -m "autopilot test" "house-prices-advanced-regression-techniques"
結果は、このようになりました。
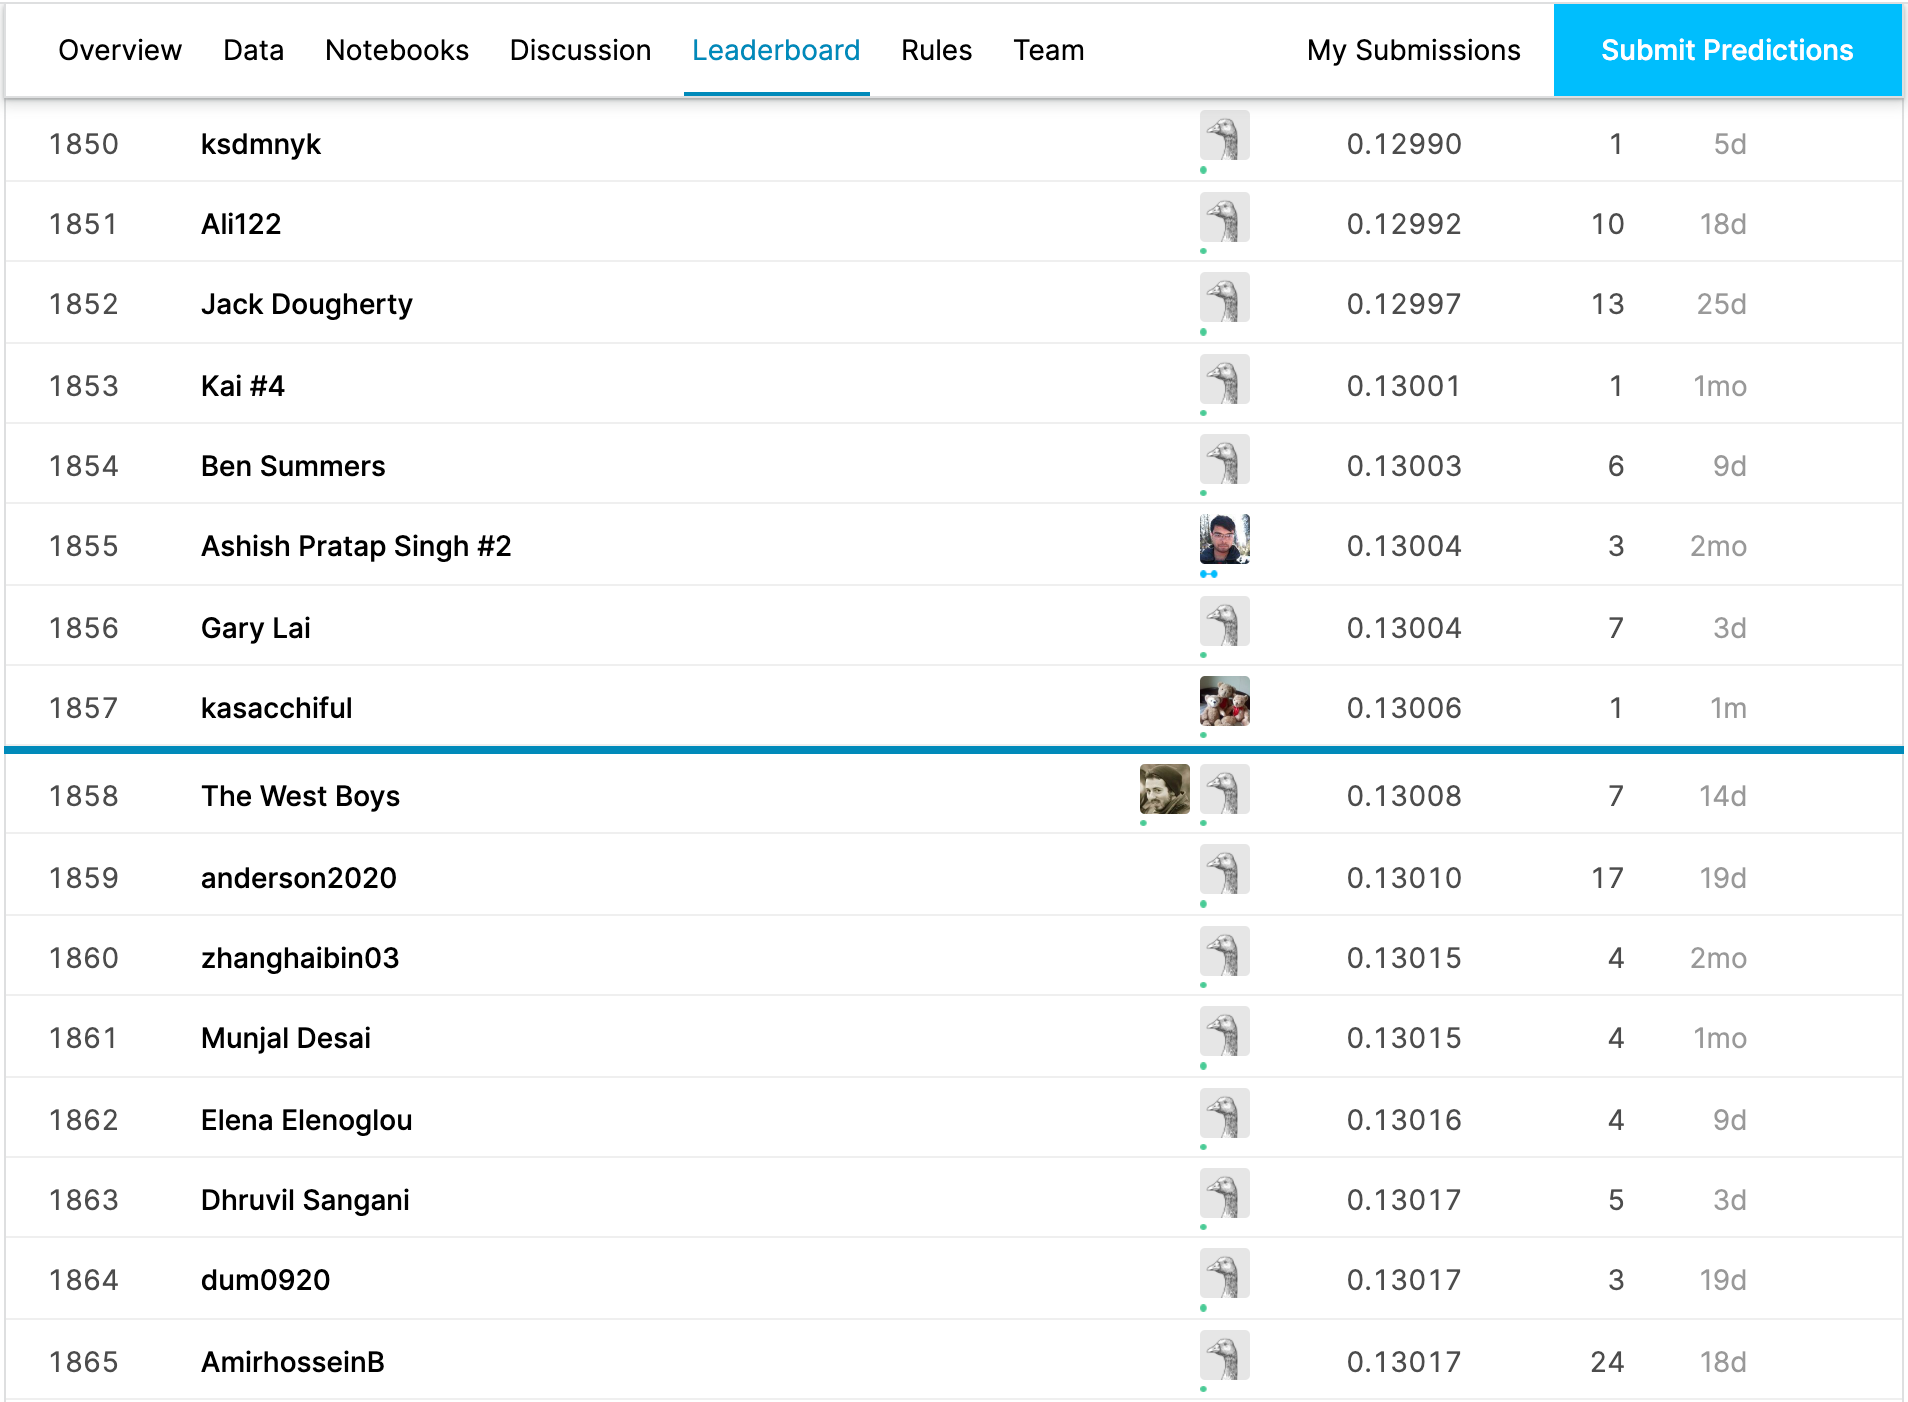
まずまずの結果ではないでしょうか。
まとめ
いかがでしたでしょうか。 Amazon SageMaker Autopilotは、特に何も考えなくてもある程度良い性能をサクッと得られるモデルを作ってくれるので、とても便利だと思います。 Autopilotはサンプルノートブック実行の記事が多いですが、 今回はKaggleのデータを使ってどの程度うまくいくのかも合わせて見てみましたので、 参考になればと思います。
補足
発表では、AutoGluonについても少しお話ししています。紹介だけですね。 実際試そうと思っていましたが、準備不足で(いまだに)試せていません。
また、LTも発表しています。こちらはJDLAのE資格受験内容のメモです。 LTのくせに本編の発表資料よりページ数が多いのは、ご愛嬌ということで。